

Shopify Inventory Transfer: Process, Benefits, and Best Practices
Learn how to create Shopify inventory transfers, process shipments, and receive stock, with statuses, setup steps, limitations, and a faster alternative.


Shopify inventory transfers let you move stock between your store locations, or to and from external locations like suppliers, directly from the Transfers page in your Shopify admin. Instead of raising a new purchase order every time one warehouse runs low, you shift existing inventory from a location that has excess to the one that needs it. Shopify tracks the shipment, updates quantities at both ends, and keeps your counts accurate the whole way through.
That matters more than most merchants realize. Stock sitting in the wrong warehouse is functionally the same as a stockout, and reordering to cover it just creates an overstock somewhere else.
In this guide, we'll cover what an inventory transfer in Shopify is, the exact steps to create, process, and receive one, what each transfer status means, where the native feature falls short, and how a dedicated tool fills those gaps.
Key Takeaways
• Shopify inventory transfers move stock between locations without new purchase orders, from Products > Transfers in your admin.
• Out-of-stocks and overstocks cost retailers $1.73 trillion annually according to the IHL Group report, 2025.
• Shopify won't tell you when or how much to transfer. Those planning stays manual.
What is an inventory transfer in Shopify?
An inventory transfer in Shopify is a record that moves stock between two locations and tracks it in transit, so quantities stay accurate at both the origin and the destination. You can transfer between any of your store locations, and you can even leave the origin or destination blank to receive stock from an external supplier or ship to a location Shopify doesn't track.
Here's the practical scenario. You run two warehouses. Warehouse A holds 100 units of a product and Warehouse B is down to 5, but most of the demand is coming from B's region. Without transfers, your options are to reorder from your supplier (slow, and it ties up cash) or let B sell out. With a transfer, you move 40 units from A to B, Shopify marks them as incoming at B, and once received they're counted correctly at both locations. No purchase order, no manual stock edits.
One detail worth knowing: transferring inventory to a location records the quantity there but doesn't automatically make the product sellable at that location. If the product isn't already stocked at the destination, Shopify asks whether you want to activate it when you receive the transfer.
Why do Shopify inventory transfers matter for multi-location stores?
Because misplaced inventory is one of the most expensive problems in retail. IHL Group's 2025 research found that inventory distortion, the combined cost of out-of-stocks and overstocks, drains $1.73 trillion from retailers globally every year, equal to 6.5% of worldwide retail sales. Transfers attack both sides of that problem at once: they clear excess from one location while fixing the shortage at another.
In day-to-day terms, using Shopify to transfer inventory between locations helps you:
• Rebalance stock across warehouses and retail stores before a shortage becomes a stockout.
• Restock a fast-selling location from a slow one instead of placing a new supplier order.
• Track inventory while it's physically in transit, so nothing disappears between buildings.
• Keep counts accurate at every location without manual stock adjustments.
The payoff compounds. Retailers that treat inventory visibility as a priority outperform those that don't: IHL's 2026 research ranks inventory visibility as the number two technology priority, cited by 39% of retailers surveyed 2026.
What do you need before creating a transfer?
You need at least two locations set up, inventory tracking enabled on the products you're moving, and enough available stock at the origin. Getting these three things right first is the difference between a clean transfer and a confusing quantity mismatch later.
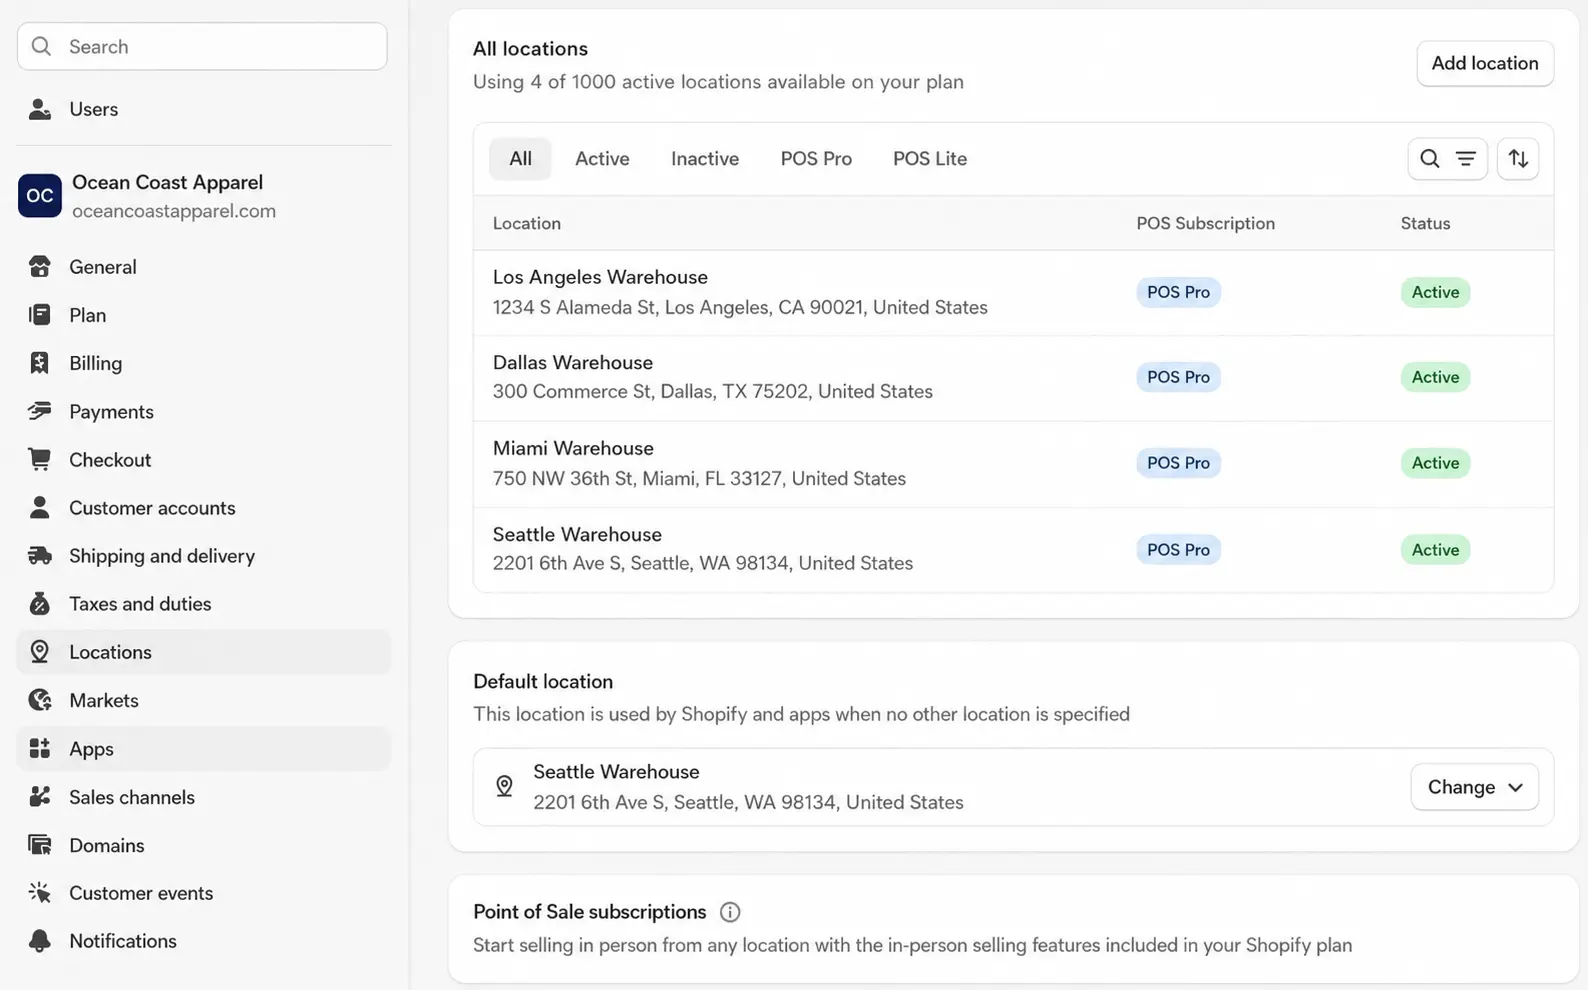
Set up your store locations
Go to Settings > Locations in your Shopify admin and add every warehouse, retail store, or fulfillment center you operate. Transfers work between any of your store locations, including ones that aren't active for fulfillment, and you can leave the origin or destination blank when dealing with an external supplier.
Enable inventory tracking on your products
Confirm that Track quantity is turned on for each product or variant you plan to move. Shopify can't record inventory movement for untracked products, so this step isn't optional.
Check available stock at the origin
Verify the origin location actually holds enough available inventory to cover the transfer. If it doesn't, adjust the quantities or replenish first. And if you use a 3PL or third-party fulfillment service, make sure those locations are configured correctly so quantities update accurately after the transfer. In our experience, this is where most transfer discrepancies start: the app-managed location and the physical warehouse don't agree before the transfer even begins.
How to transfer inventory in Shopify (step-by-step)
Transferring inventory in Shopify takes four steps: create the transfer, add products, process it (move it to in transit), and receive the items at the destination. The whole flow lives under Products > Transfers in your admin. Here's each step in detail.
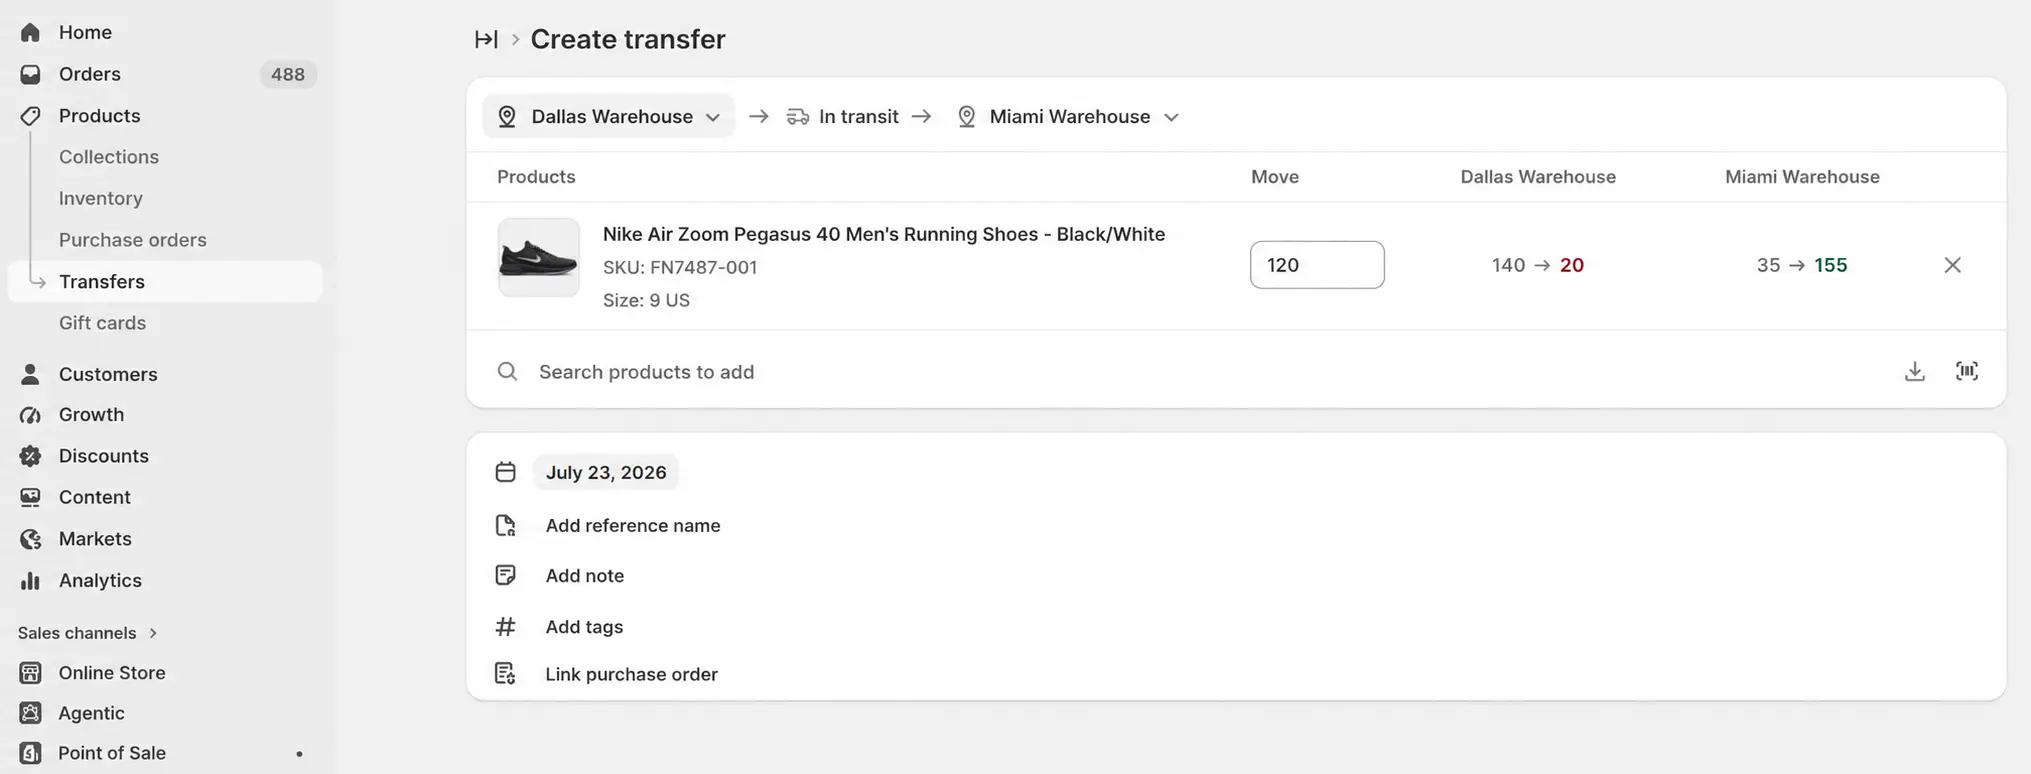
Step 1: Create the transfer
1. From your Shopify admin, go to Products > Transfers.
2. Click Create transfer.
3. Select an origin location and a destination location. Either can be left blank for external locations like suppliers.
4. Optionally add a reference name, note, or tags to keep transfers searchable later.
At this point the transfer saves as a Draft. Nothing is reserved yet, and every detail can still be edited.
Step 2: Add products to the transfer
You can add products three ways, and the right one depends on volume:
Manually. Click the Search products field, find items by name or SKU, click Add, then enter quantities in the Move column. Shopify shows you the resulting inventory change at both locations as you type, which is a genuinely useful sanity check.
By CSV import. For bulk transfers, click Import, then Add file. Use Shopify's transfer CSV template with two key columns: the variant identifier (SKU or barcode) and the quantity being moved. Upload the file and click Import products. The transfer populates automatically. One caution: if you import into an existing transfer, matching variants get their quantities overwritten by the CSV values.
By barcode scanner. Connect a USB or Bluetooth scanner, or use the camera on your Shopify POS device. Scan each item and Shopify identifies the variant and increments the quantity as you go.
Click Save when everything's in.
Step 3: Process the transfer
This is where the older "Mark as In Progress" workflow has changed. Shopify now gives you three processing actions, depending on where the stock physically is:
Action | What it does |
Move to in transit | Status changes to In progress. Inventory shows as incoming at the destination and a shipment is created automatically. |
Mark as ready to ship | Reserves the inventory at the origin before it leaves. You can add tracking details or split the transfer into multiple shipments. |
Mark as transferred | For stock you've already physically moved. Shopify receives it instantly and makes it available at the destination. |
After processing, you can still edit products, notes, tracking numbers, and tags, but the origin and destination locations are locked. If a location is wrong, duplicate or cancel the transfer.
For in-transit shipments, you can attach a tracking number, carrier, expected arrival date, and even shipment costs like freight or customs duties.
Step 4: Receive the items at the destination
When the shipment arrives:
1. Open the transfer and click Receive items.
2. Accept or reject items, either in bulk or by entering specific quantities per line.
3. Click Save.
Accepted inventory becomes available at the destination. Rejected inventory is recorded on the transfer but doesn't add stock anywhere, which keeps damaged or missing units out of your sellable counts. If you receive only part of a shipment, the transfer stays In progress until the rest arrives, and you can correct received quantities later through Manage received items.
What do Shopify inventory transfer statuses mean?
Every transfer moves through a defined set of statuses, and each one tells you exactly where the stock is right now. Here's what each status means:
Status | Meaning |
Draft | The transfer is created but not processed. Nothing is reserved and everything is editable. |
Ready to ship | Inventory is reserved at the origin and waiting to leave. |
In progress | The shipment is in transit, or only partially received. Stock shows as incoming at the destination. |
Transferred | All items have been received and quantities are updated at both locations. |
Canceled | The transfer was called off. Any reserved items are released back to the origin. |
Transfers also support multiple shipments. If half your stock ships today and half next week, each shipment gets its own ID (like T289-1), its own tracking, and can be received separately.
Where does Shopify's native transfer feature fall short?
Shopify transfers record inventory movement well, but they don't plan it for you. For a store with two locations and steady demand, that's fine. For a brand juggling several warehouses and sales channels, four gaps show up quickly:
No transfer recommendations. Shopify won't tell you when a location is trending toward a stockout or how many units to move. You're watching stock levels and doing the math yourself.
No approval workflow. Any staff member with access can create and process a transfer. There's no built-in step for a manager to review before stock leaves a warehouse.
No advanced warehouse features. Bin locations, pick lists, and labor management aren't part of the transfer flow. Shopify tracks that stock moved, not how it moves inside the building.
No demand-based optimization. Transfers don't factor in sales velocity, seasonality, or shipping costs. The tricky part is that deciding what to move is usually harder than moving it, and that's exactly the part Shopify leaves manual.
What happened to Stocky's stock transfers?
Stocky, Shopify's inventory management app was available with POS Pro, used to handle stock transfers. In 2025, Shopify migrated transfer creation and management out of Stocky and into the main Shopify admin. The move brought real upgrades: multiple shipments per transfer, barcode scanning for adding and receiving items, bulk CSV import, and shipment-level receiving.
So if you're searching for transfer instructions and finding old Stocky screenshots, that's why. Everything now lives at Products > Transfers, and the steps above reflect the current workflow.
How does Channel Bay handle inventory transfers?
Channel Bay is an inventory management app that syncs your channels, stores, and locations in one place, then adds the planning layer Shopify leaves out: real-time stock visibility, low-stock alerts, and threshold-based restocking signals. Where Shopify records a transfer after you've decided to make it, Channel Bay helps you spot the need before the stockout happens.
The workflow looks like this:
1. Sync all your sales channels, stores, and locations once.
2. Set a threshold value for each item.
3. Get a low-stock alert the moment inventory dips below its threshold.
4. See at a glance which location has surplus stock, and transfer from there.
Creating a stock transfer in Channel Bay
Because locations and channels are already synced, a transfer takes a few clicks:
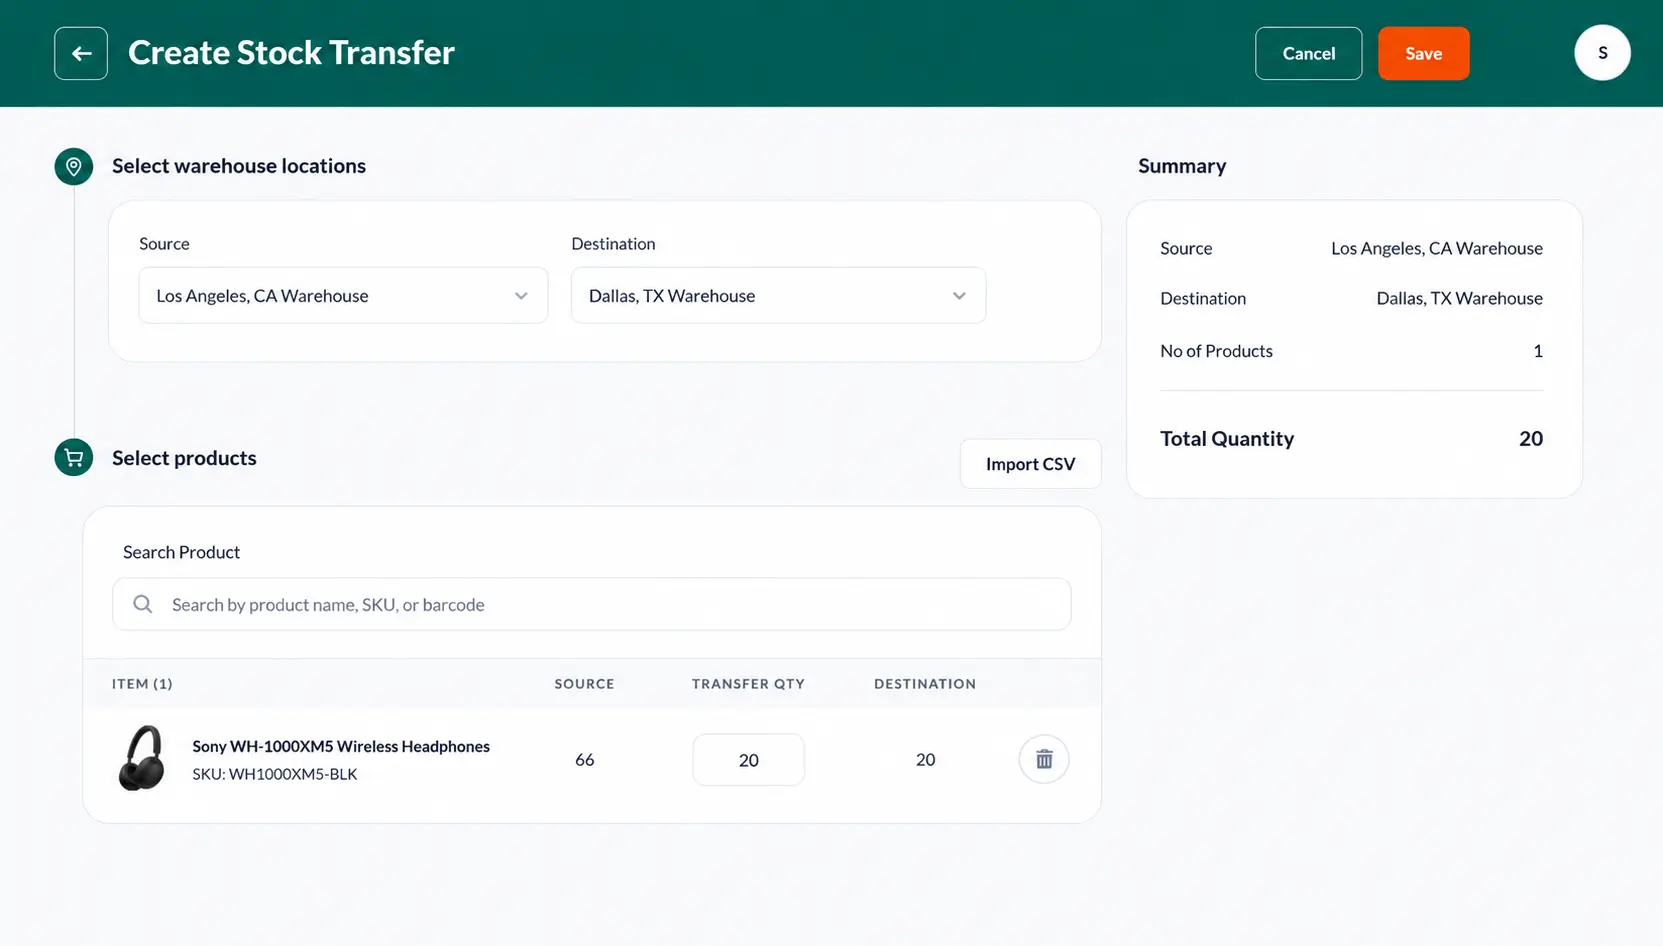
1. Go to Channel Bay Admin > Stock Transfer.
2. Select the source location (the one with surplus) and the destination (the one running low).
3. Add products by name, SKU, barcode scanning, or bulk import via CSV.
4. Enter the quantity to transfer, and how much stock to keep at the source. That “keep at source” control is the detail we've found merchants appreciate most, since it stops a transfer from accidentally draining the origin below its own safety level.
5. Click Save, then dispatch the transfer.
From dispatch onward, Channel Bay tracks the status and updates the dashboard automatically.
Transfer statuses in Channel Bay
Channel Bay uses five statuses, including one Shopify doesn't have:
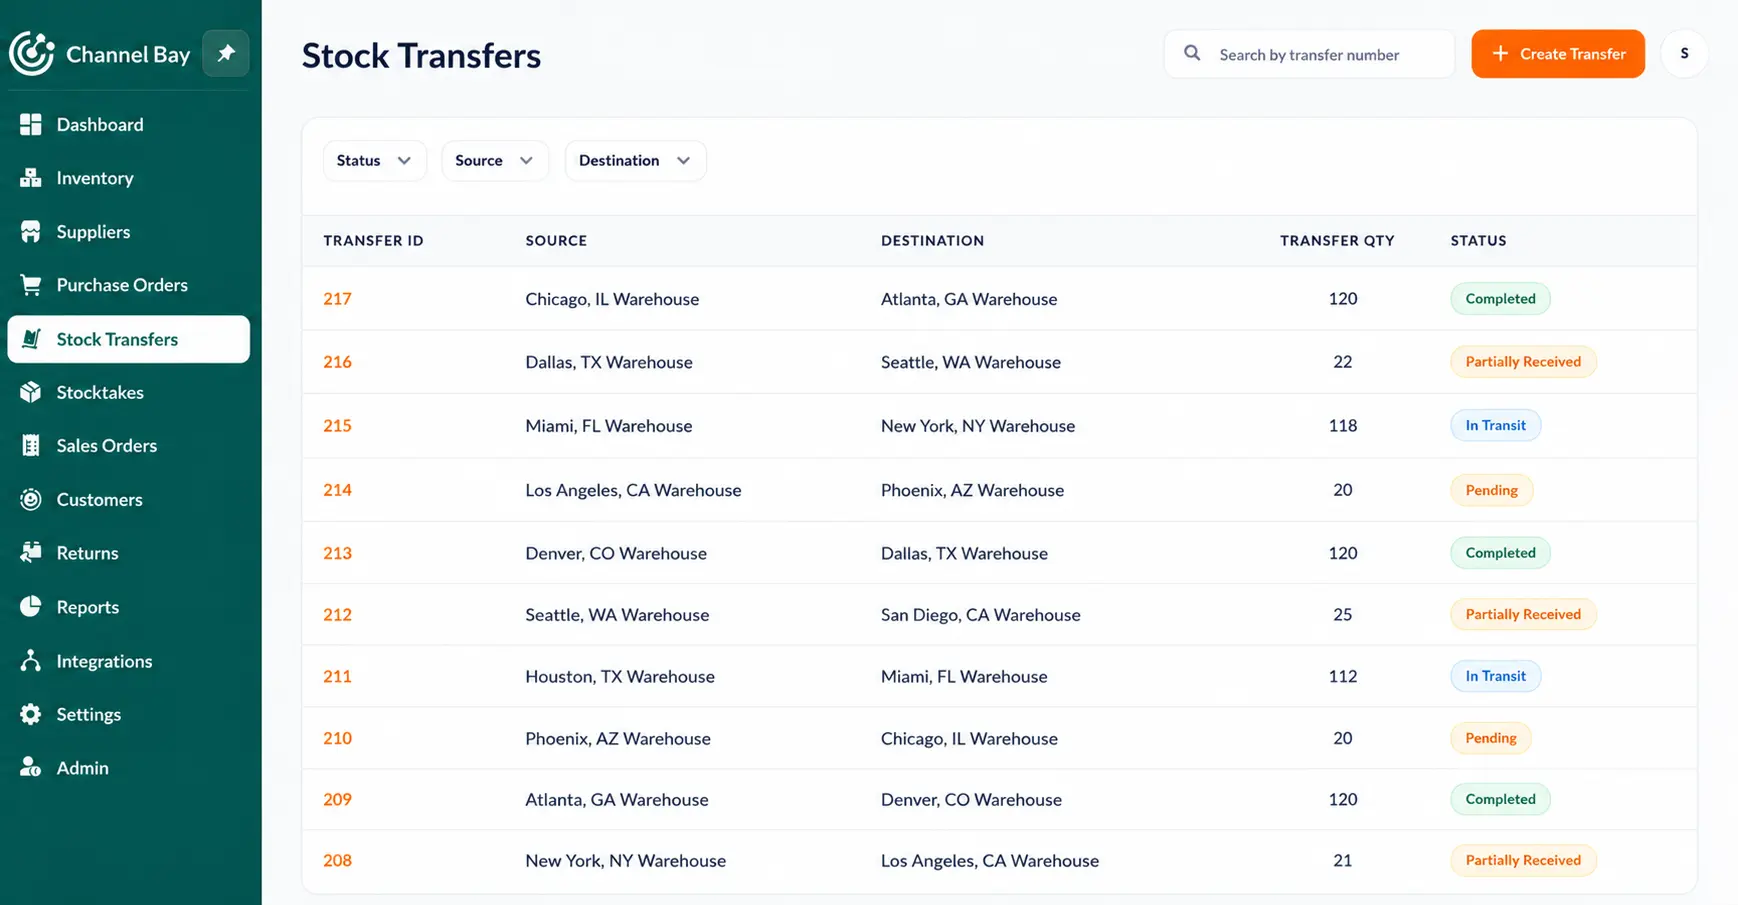
Status | Meaning |
Pending | Transfer created, no action taken yet. |
In Transit | Stock is on its way to the destination. |
Partially Received | Some items have arrived, some haven't. |
Completed | Everything received, transfer closed cleanly. |
Cancelled | The transfer was called off. |
The Partially Received status is a small thing that saves real confusion, because split deliveries are the norm rather than the exception once you're moving pallets between warehouses.
FAQs
Can I transfer inventory between locations in Shopify for free?
Yes. Inventory transfers are a built-in Shopify admin feature at Products > Transfers, available on standard plans at no extra cost. You need at least two locations set up and Track quantity enabled on the products you're moving. Shipping the stock is your only real cost.
Does a Shopify inventory transfer create a purchase order?
No. Transfers and purchase orders are separate documents. A transfer moves stock you already own between locations, while a purchase order records incoming stock from a supplier. Shopify does let you link a purchase order to an inventory transfer, so receiving happens on the transfer while the commercial record stays on the PO.
Why isn't my transferred product sellable at the new location?
Transferring records the quantity at the destination but doesn't activate the product there. When you receive items that aren't stocked at that location, Shopify prompts you to Stock and fulfill them. If you clicked Not now, activate the product at that location from its Inventory section.
Can I cancel or edit a Shopify inventory transfer?
You can edit a draft transfer completely, including its locations. After processing, you can edit products, quantities, notes, and tracking, but not the origin or destination. Transfers in Draft or Ready to ship status can be canceled, which releases reserved stock back to the origin. Only drafts can be deleted.
Bottom line
Shopify inventory transfers are the right way for keeping stock balanced across locations without reordering what you already own. The admin workflow is solid: create, process, receive, with clear statuses, multi-shipment support, and accurate counts at both ends. What it won't do is think for you. There are no transfer suggestions, no approvals, and no demand-based planning.
That's the gap Channel Bay can close. With every channel and location synced in real time, threshold alerts flag the shortage early, and the transfer itself takes a few clicks from a single dashboard, including control over how much stock stays behind at the source.

